
| 일 | 월 | 화 | 수 | 목 | 금 | 토 |
|---|---|---|---|---|---|---|
| 1 | 2 | 3 | 4 | 5 | 6 | 7 |
| 8 | 9 | 10 | 11 | 12 | 13 | 14 |
| 15 | 16 | 17 | 18 | 19 | 20 | 21 |
| 22 | 23 | 24 | 25 | 26 | 27 | 28 |
- 테라폼
- Amazon CloudWatch
- amazon sns
- Docker0
- 추가 보안 그룹
- docker
- instances failed to join cluster
- route53
- fruition
- Terraform
- Service Account
- saa-c03 #saa #aws certified solutions architect - associate
- node group
- 코드커버리지
- jenkins
- helm_release
- aws ses #aws lambda
- ingestion
- 클러스터 보안 그룹
- kubernetes
- assumerole
- NAT
- 에이전트 구성
- httpasswd
- s3
- 에이전트 유형
- Gateway
- IRSA
- Pipeline
- aws-loadbalacner-controller
- Today
- Total
cloudwithbass
[Terraform] ★ 테라폼 연습하기 6: eks cluster 구성과 Assume Role, kubeconfig 본문
[Terraform] ★ 테라폼 연습하기 6: eks cluster 구성과 Assume Role, kubeconfig
cwb111 2024. 9. 1. 22:59
지난 포스팅까지 구성했던 Terraform 인프라 구성도입니다.
이번 포스팅에선 priavte subnet에 EKS cluster를 구성해보겠습니다.
전체 소스 코드는 아래 깃허브에서 확인하실 수 있습니다.
https://github.com/Dminus251/practice-terraform/tree/main/demo06-eks
목차
1. Cluster
테라폼 문서를 참고해 eks cluster를 구성합니다.
modules/t-aws-eks/cluster/main.tf
resource "aws_eks_cluster" "example" {
  name     = var.cluster-name
  role_arn = var.cluster-role_arn

  vpc_config {
    subnet_ids = var.cluster-subnet_ids
  }
  access_config {
    authentication_mode = "API_AND_CONFIG_MAP"
    bootstrap_cluster_creator_admin_permissions = true
  }
}- role_arn은 Cluster에 할당할 AWS IAM role입니다.
- eks 클러스터에는 k8s의 컨트롤 플레인의 요소들이 있으므로 node, pod 등 k8s 리소스들에 접근해야 합니다.
- 따라서 해당 권한이 있는 role을 2번 항목에서 생성하고, 루트 모듈에서 이 변수에 그 role을 할당할 것입니다.
- access_config는 이 포스팅의 3-1번 항목, 액세스 구성에서 설명하겠습니다.
resource "terraform_data" "update_kubeconfig" {
  provisioner "local-exec" {
    command = "aws eks update-kubeconfig --region ap-northeast-2 --name ${var.cluster-name}"
  }
  depends_on = [aws_eks_cluster.example]
}
이 내용은 이 포스팅의 3-2번 항목, kubeconfig에서 설명하겠습니다.
modules/t-aws-eks/cluster/vars.tf
variable "cluster-name" {
  type = string
}
variable "cluster-role_arn" {
  type = string
}

variable "cluster-subnet_ids" {
  type = list(string)
}
modules/t-aws-eks/cluster/outputs.tf
output "endpoint" {
  value = aws_eks_cluster.example.endpoint
}

output "kubeconfig-certificate-authority-data" {
  value = aws_eks_cluster.example.certificate_authority[0].data
}

output "cluster-name" {
  value = var.cluster-name
}endpoint와 kubeconfig-certificate-authority-data는 Kubernetes provider 구성 시 사용합니다.
이번 포스팅에선 kubernetes provisioner를 사용하지 않지만, 나중에 쓰일 수 있기 때문에 테라폼 문서의 코드대로 일단 구성해놨습니다.
cluster-name은 data 블록에서 cluster에 접근하기 위해 사용합니다.
certificate_authority attribute의 값이 뭐길래
output으로 출력해 보겠습니다.

위와 같이 map이 list 안에 있는 구조입니다.
이는 base64로 인코드된 값이며, data attribute를 이용해 cluster와 통신할 수 있습니다.
2. Role
을 설명하기 전에, 원활한 이해를 위해 AssumeRole에 대해 먼저 알아야 합니다.
2-1. Asssume Role이란?
- 기본적으로 AWS resource들은 다른 리소스에 대한 접근 권한이 없습니다.
- 따라서 리소스가 특정 동작을 수행할 수 있도록 허용하려면 해당 리소스에 role을 부여해야 하는데, role에 필요한 것이 Assume Role Policy입니다.
- Assume Role Policy 임시적인 보안 자격 증명을 제공하므로 다른 AWS resources에 API call을 사용할 수 있습니다.
AWS의 AssumRole 문서에는 아래와 같은 내용이 있습니다.
When you create a role, you create two policies: a role trust policy that specifies who can assume the role, and a permissions policy that specifies what can be done with the role. You specify the trusted principal that is allowed to assume the role in the role trust policy
즉, 모든 role은 Assume Role이 필요합니다.
이 내용은 콘솔에서 role의 신뢰 관계 메뉴에서 확인할 수 있습니다.

예를 들어서 설명하겠습니다.
저는 EC2가 S3 버킷에 대해 모든 권한을 허용하는 role을 만들 것입니다.
이 role의 이름을 ec2_allow_s3라고 가정하겠습니다.
이때 필요한 policy는 두 가지 입니다.
- Assume Role Policy: EC2 인스턴스가 Role을 가정할 수 있도록 허용하는 policy
- AmazonS3FullAccess policy: S3 bucket에 대한 모든 권한을 허용하는 policy
이 두 정책을 ec2_allow_s3 role에 부여하고, ec2_allow_s3을 ec2에 부여하면 이제 이 ec2는 s3에 대한 모든 권한을 갖게 됩니다.
만약 ec2_allow_s3을 ec2가 아닌 다른 리소스에 부여하는 경우, 정상적으로 동작하지 않을 것입니다.
왜냐하면 신뢰 정책이 ec2만을 assume하도록 허용하기 때문입니다.
modules/t-aws-eks/iam/main.tf
이제 본격적으로 role 모듈에 대해 설명하겠습니다.
코드가 길어서 부분적으로 나누어 보겠습니다.
모든 코드는 eks_cluster 테라폼 문서의 IAM Role for EKS Cluster 코드를 사용했습니다.
data "aws_iam_policy_document" "assume_role" {
  statement {
    effect = "Allow"

    principals {
      type        = "Service"
      identifiers = ["eks.amazonaws.com"]
    }

    actions = ["sts:AssumeRole"]
  }
}
이게 위에서 설명했던, EKS 서비스가 role을 assume하도록 하는 정책입니다.
허용하는 actions에 sts:AssumeRole이 있는 것을 확인할 수 있습니다.
이 정책을 role에 할당하면, 그 role은 eks 서비스만이 사용할 수 있을 것입니다.
resource "aws_iam_role" "example" {
  name               = "eks-cluster-example"
  assume_role_policy = data.aws_iam_policy_document.assume_role.json
}
위 정책이 할당된 role입니다.
role 이름은 eks-cluster-example 입니다.
나머지 policy들은 코드의 유연성을 위해 밑의 aws_iam_role_policy_attachment 리소스로 할당합니다.
#role과 policy 연결.
resource "aws_iam_role_policy_attachment" "example-AmazonEKSClusterPolicy" {
  policy_arn = "arn:aws:iam::aws:policy/AmazonEKSClusterPolicy"
  role       = aws_iam_role.example.name
}

resource "aws_iam_role_policy_attachment" "example-AmazonEKSVPCResourceController" {
  policy_arn = "arn:aws:iam::aws:policy/AmazonEKSVPCResourceController"
  role       = aws_iam_role.example.name
}
eks-cluster-example role에 두 정책을 연결합니다.
정책 1: AmazonEKSClusterPolicy
쿠버네티스가 요구하는 권한을 부여합니다. 그 내용은 아래와 같습니다.

정책 2: AmazonEKSVPCResourceController
VPC Resource Controller가 워커 노드의 ENI와 IP를 관리하기 위한 정책입니다.

modules/t-aws-eks/iam/outputs.tf
output "arn" {
  value = aws_iam_role.example.arn
}
eks cluster를 생성할 때 이 role을 사용하도록 arn을 output으로 내보냅니다.
3. 클러스터 액세스 설정
3-1. 액세스 구성
1번과 2번 항목의 eks_cluster와 role만으로도 eks cluster를 생성할 수 있습니다.
하지만 aws iam user가 eks cluster에 액세스하기 위해선 eks cluster에 대한 액세스 설정이 필요합니다.
저는 처음에 다음과 같이 configmap 리소스를 생성했습니다.
AWS IAM user를 system:masters 그룹에 속하게 해서 클러스터에 대한 관리자 권한을 얻는 config map입니다.
resource "kubernetes_config_map" "aws_auth" {
  metadata {
    name      = "aws-auth"
    namespace = "kube-system"
  }

  data = {
    mapRoles = <<EOF
- rolearn: var.role_arn
  username: system:node:{{EC2PrivateDNSName}}
  groups:
    - system:bootstrappers
    - system:nodes
EOF
    mapUsers = <<EOF
- userarn: "arn:aws:iam::user-arn:user/user-name"
  username: "username"
  groups:
    - system:masters
EOF
  }
}
하지만 아래 AWS 문서에 따르면 aws-auth configmap은 더이상 사용되지 않습니다.

따라서 더 권장되는 방법인 액세스 항목을 통해 액세스 설정을 하겠습니다.
이 포스팅의 1번 항목, eks_cluster의 main.tf에서 access_config 블록을 기억하시나요?
코드를 다시 한 번 확인해 보겠습니다.
modules/t-aws-eks/cluster/main.tf
resource "aws_eks_cluster" "example" {
  # other configurations..
  access_config {
    authentication_mode = "API_AND_CONFIG_MAP"
    bootstrap_cluster_creator_admin_permissions = true
  }
}
access_config 블록이 클러스터의 액세스 항목을 구성하는 부분입니다.
authentication_mode는 CONFIG_MAP, API or API_AND_CONFIG_MAP 중 선택할 수 있고
bootstrap_cluster_creator_admin_permissions는 클러스터 생성자에게 admin 권한을 줄 지 선택하는 attribute 같습니다.
사실 bootstrap_cluster_creator_admin_permissions에 대해 테라폼 문서의 설명에도 '(Optional) Whether or not to bootstrap the access config values to the cluster. Default is false.'라고만 나와있고, 구글에 검색해 봐도 이게 어떤 내용의 attribute인지 잘 나오지 않아서 true로 바꿔봤는데 다행히 클러스터 생성자에게 admin 권한을 주는 게 맞더라고요.
아무튼, 이제 terraform apply로 클러스터를 프로비저닝하고 EKS의 콘솔 → 클러스터 → 액세스에 들어가면 아래 사진과 같을 겁니다.
액세스 구성의 인증 모드가 authentication_mode고, IAM 액세스 항목에는 클러스터를 생성한 IAM user가 들어가 있습니다.
참고로 인증 모드가 EKS API 및 ConfigMap이 아니라, ConfigMap 단일 항목일 경우 IAM 액세스 항목에서 액세스 항목 버튼이 비활성화 됐습니다.

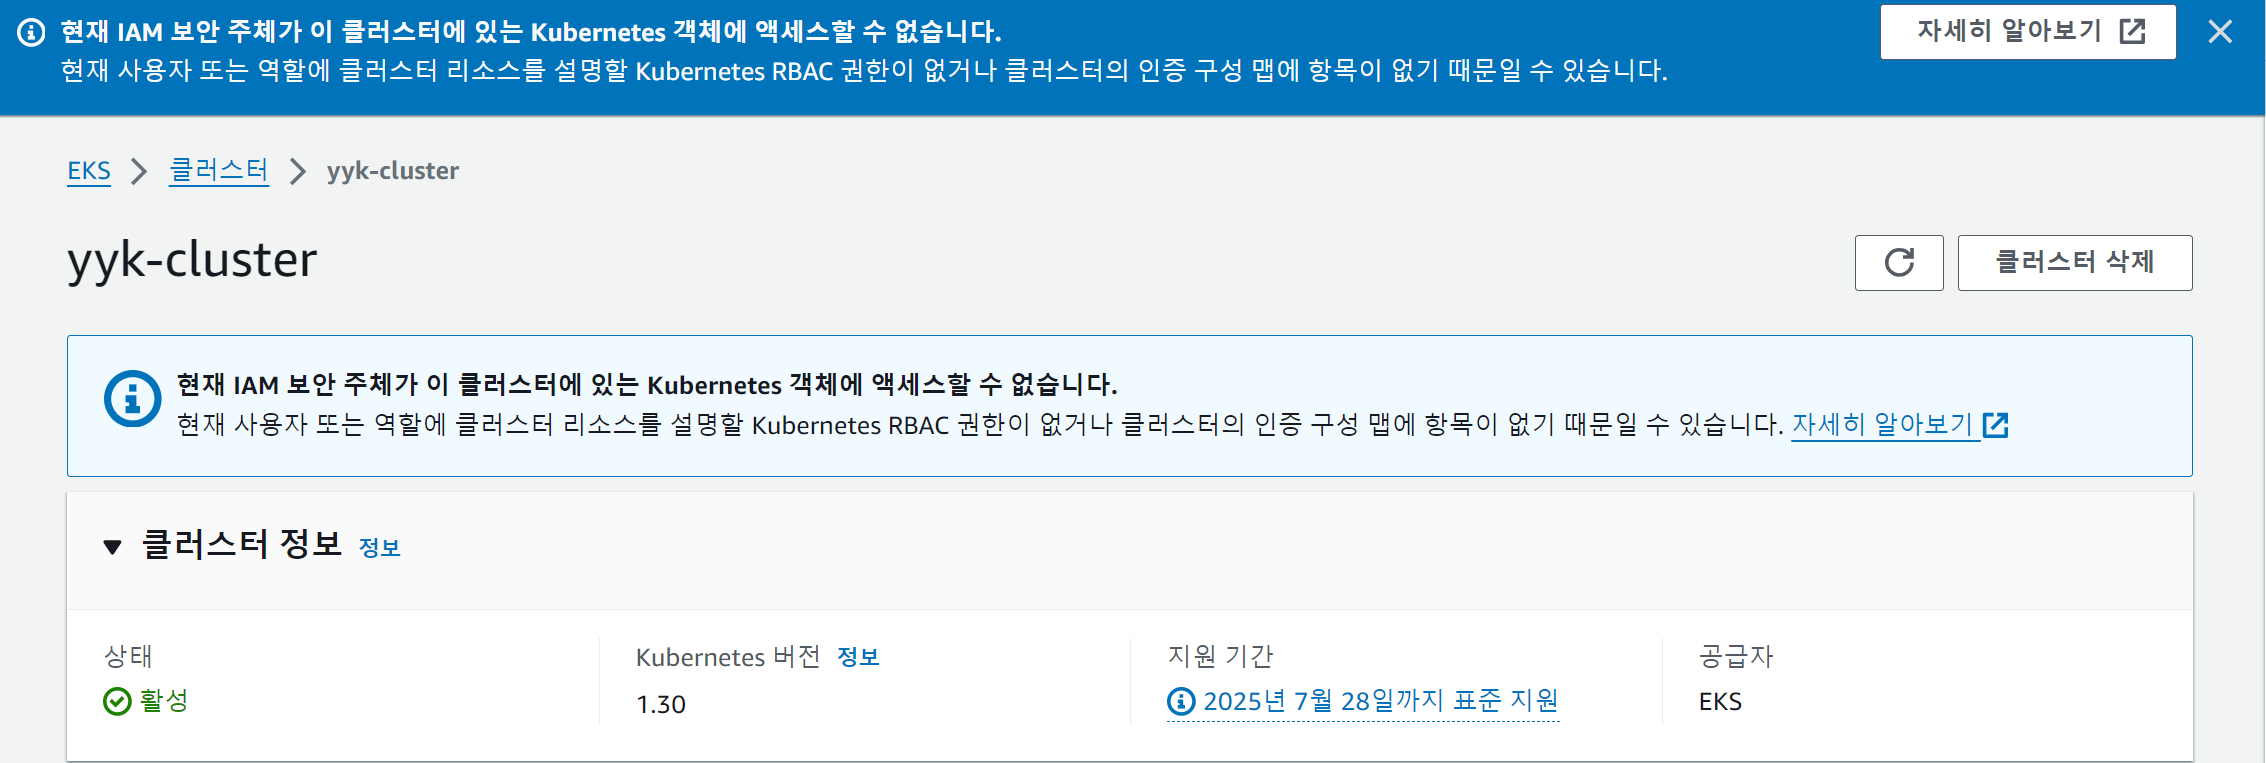
만약 테라폼 코드에서 access_config를 구성하지 않으면 아래 사진처럼 '현재 IAM 보안 주체가 이 클러스터에 있는 Kubernetes 객체에 액세스할 수 없습니다.' 에러가 발생합니다.
3-2. kubeconfig
이제 eksctl get cluster 명령을 통해 클러스터에 정상적으로 접근할 수 있는 사실을 확인할 수 있습니다.
하지만 kubectl 명령을 실행하면, 아래 사진과 같이 'You must be logged in to the server (the server has asked for the client to provide credentials)' 에러가 발생할 것입니다.

이 에러를 이해하기 위해선 kubeconfig에 대해 알아야 합니다.
kubeconfig란?
- Kubernete 클러스터에 대한 정보가 있는 파일입니다.
- 구체적으론 Clusters, Contexts, Users에 대한 정보가 있습니다. 차례로 확인해보곘습니다.
주로 .kube 디렉터리는 홈 디렉터리에 있을 것이므로 kubeconfig를 다음과 같이 볼 수 있습니다.
cat ~/.kube/config
가장 먼저 cluster에 대한 정보가 보입니다.
저는 같은 localhost에서 세 개의 클러스터를 사용해서 총 세 개가 보이는 모습입니다.
여기서 certificate-authority-data는 CA 인증서 정보입니다.

다음으로 context에 관한 내용도 있습니다.
context는 cluster와 user를 묶어줍니다.
current-context는 yyk-cluster입니다.

마지막으로 user에 대한 정보입니다.
그리고 이곳이 'You must be logged in to the server' 에러의 원인이 되는 곳입니다.

- kubectl 명령을 실행할 땐 자격 증명이 필요합니다.
- 그래서 사실 kubectl 명령을 실행할 때마다 aws에 자격 증명을 요청해야 합니다.
- 다시 위 kubeconfig의 내용을 보면, exec 필드에 여러 args와 함께 command: aws 필드가 존재합니다.
- yyk-cluster의 경우 kubectl 클러스터 사용 시 aws --region ap-northeast-2 eks get-token --cluster-name yyk-cluster --output json 명령을 실행해서 JSON 형태의 인증 토큰을 생성합니다.
- 이 토큰은 다시 kubectl 명령으로 리턴되고, 이제 kubernetes API server에 정상적으로 접근할 수 있습니다.
생각해 보면, kubectl get pod와 같은 명령을 실행할 때 클러스터의 이름을 지정하지 않습니다. 이름을 지정하지 않았는데도 원하는 클러스터의 정보를 볼 수 있었던 이유가 바로 이것입니다.
그래서 결국 You must be looged in the server 에러의 원인은, kubectl 명령 시 적절하지 못한 토큰을 가져왔기 때문입니다.
(상황에 따라 다를 수 있지만 적어도 이 예제에선 그렇습니다.)
이제 이 포스팅의 1번 항목에서 봤던, cluster 모듈의 terraform_data 리소스를 다시 보겠습니다.
modules/t-aws-eks/cluster/main.tf
resource "terraform_data" "update_kubeconfig" {
  provisioner "local-exec" {
    command = "aws eks update-kubeconfig --region ap-northeast-2 --name ${var.cluster-name}"
  }

  depends_on = [aws_eks_cluster.example]
}
terraform_data 리소스는 아무 동작을 하지 않는 테라폼 리소스입니다.
변수를 저장하거나, provisioner를 트리거할 때사용합니다.
provisioner "local-exec"는 테라폼이 실행되는 환경에서 실행할 명령을 정의합니다.
이 리소스 블록에서 실행하는 명령인 aws eks update-kubeconfig는 kubeconfig 파일을 업데이트 하는 명령입니다.
이 명령을 실행하면 kubeconfig 파일에 eks cluster에 관한 정보를 추가하고, current-context를 그 cluster로 지정합니다.
따라서 이제 올바른 토큰을 리턴받아서 Kubernetes API Server에 정상적으로 요청할 수 있습니다.
이제 아래 사진처럼 eksctl과 kubectl 명령 모두 정상적으로 실행됩니다.

pod가 pending 상태인 이유는 아직 워커 노드를 구성하지 않았기 때문입니다.
4. 루트 모듈
이제 루트 모듈만 구성하면 끝입니다.
main.tf
module "eks-role"{
  source = "./modules/t-aws-eks/iam"
}

module "eks-cluster"{
  source = "./modules/t-aws-eks/cluster"                                                                                  cluster-name = var.cluster-name
  cluster-role_arn = module.eks-role.arn
  cluster-subnet_ids = [ for i in module.private_subnet: i["private_subnet-id"] ]
}
이 포스팅의 2번 항목에서 사용했던 role을 사용했고, private subnet에 구성했습니다.
variables.tf
#eks cluser name
variable "cluster-name" {
  type = string
  default = "yyk-cluster"
}
data.tf
#k8s provider의 token을 얻는 데 사용
data "aws_eks_cluster_auth" "example" {
  name = module.eks-cluster.cluster-name
  depends_on = [module.eks-cluster] #클러스터 먼저 생성돼야 cluster-name output 사용 가능
}
이번 포스팅에선 사용하지 않았지만, 추후 kubernete provisioner 구성 시 사용할 데이터 블록입니다.
긴 포스팅을 봐주셔서 감사합니다.
혹시 궁금한 점이 생기면 댓글 남겨주세요!
'Terraform' 카테고리의 다른 글
| [Terraform] Terraform 연습하기 8: alb-loadbalancer-controller와 ingress, OIDC, IRSA, cert-manager (13) | 2024.09.11 |
|---|---|
| Terraform 연습하기 7: 'instances failed to join cluster' 트러블 슈팅 (4) | 2024.09.05 |
| [Terraform] 테라폼 연습하기 5: security group (1) | 2024.08.31 |
| [Terraform] 테라폼 연습하기 4: ec2 instance (1) | 2024.08.29 |
| [Terraform] 테라폼 연습하기3: NAT gateway (0) | 2024.08.27 |


